THE CONTENT CREATOR’S GUIDE TO SOCIAL MEDIA
Want to know how you can use social media to grow your followers, boost your engagement, drive sales, and become that go-to content creator? We’re going to break it all down for you and give you the inside scoop on everything you need to know about using social media in 2023 for projects with Beauty Bulletin, Brand Advisor, and Service Insider.
- INFLUENCER DELIVERABLES LETTER
- WHAT IS AN E-VENT?
- CONTENT DO’S AND DON’TS
- TIPS FOR TWITTER
- HASHTAGS
- WHAT IS A CAROUSEL?
- POSTING THE PERFECT STILL IMAGE
- POSTING THE PERFECT UNBOXING
- HOW TO CREATE INSTAGRAM REELS
- DOWNLOADING WETRANSFER LINKS
- WHAT IS NON-COPYRIGHTED MUSIC?
- ADDING NON-COPYRIGHTED MUSIC TO INSTAGRAM VIDEOS
- HOW TO ADD A LINK TO YOUR INSTAGRAM BIO
- HOW TO ADD A PERSONALISED ‘BUY NOW’ LINK TO YOUR INSTAGRAM STORIES
- HOW TO ADD A CALENDAR REMINDER TO POSTS
- DELIVERABLES LETTER:
This document will be your go-to guide with everything you need to know about the project and will be sent to you via email AND will arrive with your product packages once you have been confirmed for the project. This will include:
- What you’re getting from us
- What content is expected from you
- All relevant project dates
- Who to tag in your content
- Reference images to draw inspiration from for your own posts, and any other important info.
You can use the Deliverables Letter as your general guide, but you are encouraged to personalise your content and make it as authentic as possible so that it matches your own style, audience and how you communicate with your own followers. You can always reach out to our team for some inspo and tips on making your social media content as authentic as possible.
- An e-vent is an online event that happens over a short period of time (usually 1 or 2 days) where you and other content creators or REPS can drive challenges, competitions and giveaways where followers can join in and engage with all your content.
- This e-vent will be one of your post deliverables so you do not need to worry about being live on the day, you can prep your content before and publish content on the day of the e-vent. Your caption should tell your followers how they can enter the e-vent for a chance to win, by commenting on your post etc. Competition entry information will be provided by our team in your Deliverables Letter.
- Our team are also part of this event and will support and re-engage with your content to help drive engagement further.
DO’S:
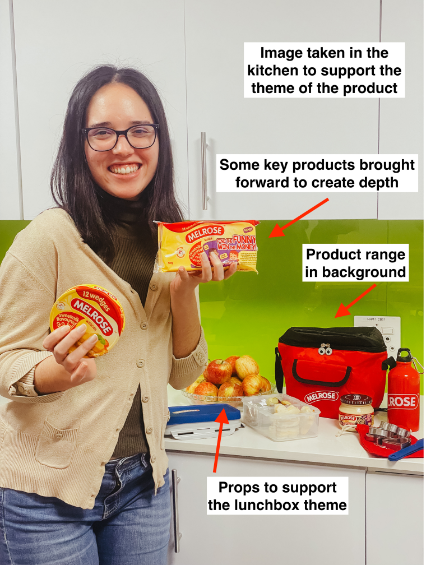
- Make sure your background is not distracting the viewer from the product, unless it matches the theme of your post and helps to bring it to life, eg: if you are shooting a festive image and have your holiday decor up in the background.
- Always be sure to spell the brands and hashtags correctly.
- If you are shooting on your phone you can use portrait mode (available on both Android and Apple devices) for high quality images.
- If you want to take a photo of yourself and don’t have someone to help you, use the timer feature and position your phone against an object (pro tip: a coffee mug will hold your phone up and you can take it wherever you’re shooting). For the clearest images, use your back camera for timed shots instead of your front/selfie camera.
- Choose natural lighting (sunshine) and avoid using artificial lighting (household ceiling light) which can make your content look orange if shot at night.
- Do make your content as authentic as possible and show yourself with the products because it makes your content more credible and relatable.
- Add props – this will make the content more natural.
- Do post your content to multiple Social Media platforms! If you use Twitter, Tik-Tok or Facebook in addition to Instagram, make sure to share your content to your audiences there too! You can either repurpose it identically to other platforms, or make small adjustments to suit each platform.
- Do use in-video captions on TikTok, or add stickers to your Instagram videos to help them stand out.
- Do plan what days to post your content on. You can see what days your followers are most active and when would be the best time to post, and then you can even schedule your posts to go live on those days.
- Do keep your content short and to the point, for videos we recommend 30 seconds max.
- Tag relevant accounts and brands in your content to ensure their audience can also follow the conversation.
- Regularly check the comments on your posts so that you can engage with your followers and make them feel important and connected to you and your content.
DON’TS:
- Don’t show any competitor products or other brands in your content, if you absolutely have to, then make sure the background products are not in the same category as the product you’re showcasing, and make sure that product is the main focus of the content.
- Don’t be in a noisy environment when filming content, try to make sure all windows are closed and there’s no audio distractions.
- Don’t post more than once per day, you don’t want to overwhelm or annoy your audience. By posting once per day, or every second day, you give your followers something to look forward to.
- Twitter means shorter and punchier captions that are limited to 280 characters each.
- You will need to make your shop links shorter for Twitter compared to Instagram and other platforms. You can do this using bitly.
- Twitter accepts most file formats, including jpegs, mp4’s and gifs, so you should be able to repost any of your content onto Twitter too.
- Hashtags are a way to connect social media content to a specific topic, event, theme, or conversation. This makes it easy to find specific content and ensure that you’re not missing out on content.
- On Instagram, you can even follow a hashtag by itself, without it being linked to a specific account or post, and this means that you will see all posts that fall under that hashtag.
- When you work with our team, we will give you a unique hashtag to use in your posts and everyone in your project team will also be following that hashtag and will be able to see your posts.
- This is why it is important to include the set hashtag in your posts, and to tag the brand accounts if needs be.
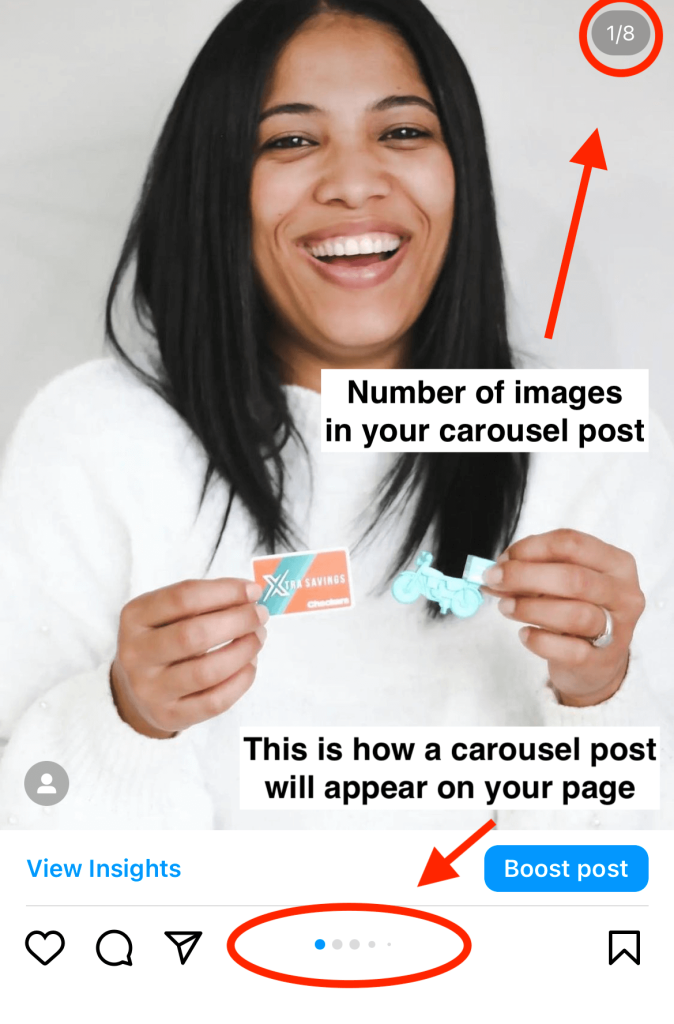
A carousel is when you have more than one image/video in one post, and you/your followers can scroll through them. A carousel is a great way to show a story through pictures or show a variety of products in one post. You can also use carousels to show before and after pictures if you’d like to show the results of using a product. Here’s how to add a carousel to your feed:
- Click the plus icon and select ‘Post’
- Choose the first photo you want to appear
- Click the ‘multiply’ icon to the left of the ‘camera’ icon to add multiple photos to your post
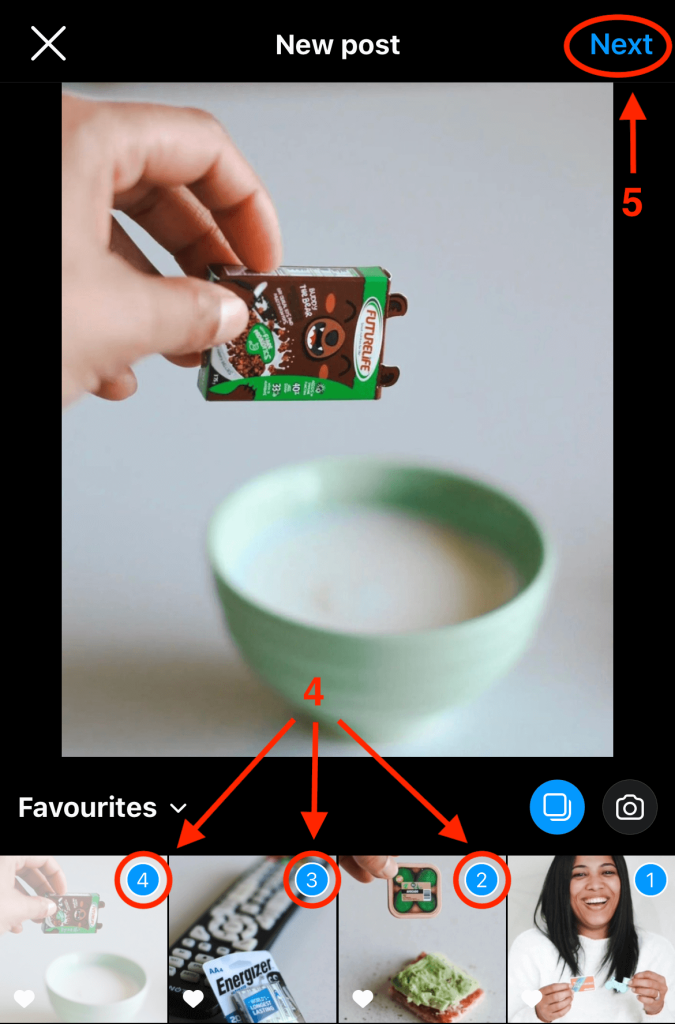
- Select the rest of your photos or videos in order of how you want them to appear in your post. You can select up to 10 photos or videos for your carousel.
- Click ‘next’, add your caption and ‘share’ to your profile.
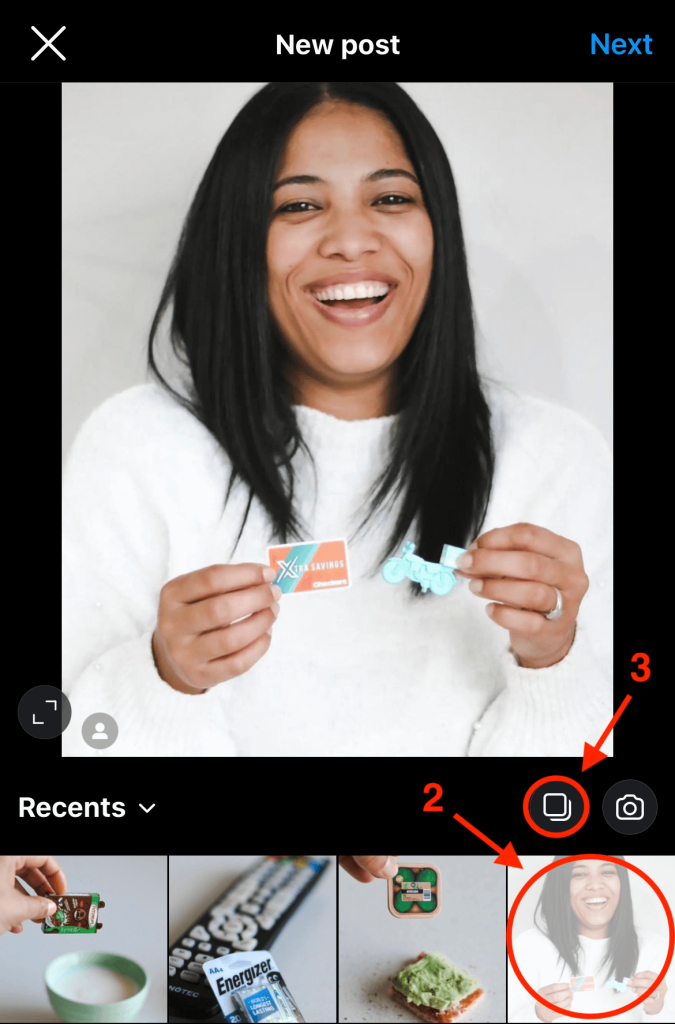
Photo credit: @being_a_boy_mom
7. POSTING THE PERFECT STILL IMAGE 📷
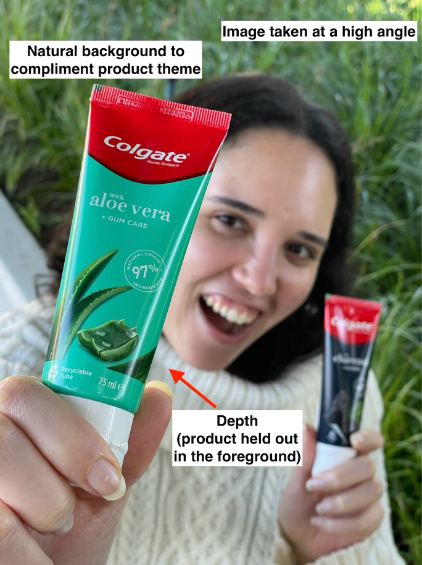
Still images are a great way to show off brands, products, and of course; yourself. There are many different types of still images for you to post, including lifestyle photos, selfies, and flat-lays (an image shot from directly above). Here’s a few tips on posting the perfect still:
- Lighting 💡: Take advantage of the ‘golden hour’ and try to use natural lighting to avoid using flash.
- Depth: add some depth to your product shots by placing a product in both the foreground and the background.
- Angles: Play around with taking photos from different angles to see the product from different viewpoints.
- Positioning: follow the ‘rule of thirds’ to make your photos eye-catching.
- Camera 📷: Make sure your camera or phone lens is clean, and that you have enough battery and storage to take a few images to choose from.

An unboxing video is a great way to show your followers exciting products and to build up a little bit of anticipation. It gives you an opportunity to show off the packaging, different angles of the product, and to share your thoughts. Here’s a few tips for unboxing videos:
- When showing a closeup of the product, make sure the camera is in focus and that you can clearly see the details of the product.
- Try not to go too fast, you want your audience to get the full unboxing experience and to see all angles of the product.
- Where possible, avoid showing any unnecessary packaging like bubble wrap, plastic, or styrofoam.
- You can choose to add music to your video, to add text to the video sharing highlights, record yourself speaking with the product while you unbox, or add a voiceover of you sharing your thoughts on the product and why you love it.
Instagram Reels are short videos that help you add more details and excitement to your content than regular images. Reels are also a great way to boost your engagement and communicate with your followers 📣, whether it’s a voiceover tutorial of the latest makeup trend, a vlog of your day, or your review of a new product. They can be anywhere from 5 – 90 seconds long, but 30 seconds is recommended. Here’s how to create an Instagram Reel:
- Film the clips that you want to add to your Reel – you can use your cellphone camera or any camera that can shoot videos.
- Go to the Instagram app and select ‘create a Reel’ and then add your chosen clips in the order you want them to appear.
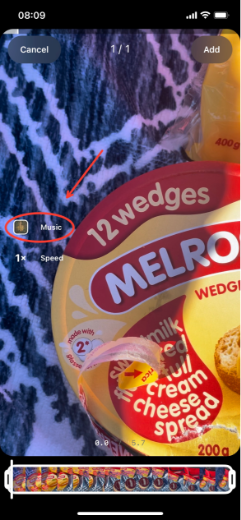
- The Instagram in-app video editor will let you cut and trim the videos, import music and also sync up music to parts of your video.
- If you don’t want to use the Instagram editing feature you can use other editing apps such as iMovie and In Shot which are both free. These apps will let you add text to the screen, add a voiceover, change the speed of clips, and also add non-copyrighted music.
- If you’re doing a Reel for a specific product then make sure the product is in focus, play around with your angles, movement and trends to make your Reel stand out.
- Once you’re happy with your Reel, add your caption and POST!
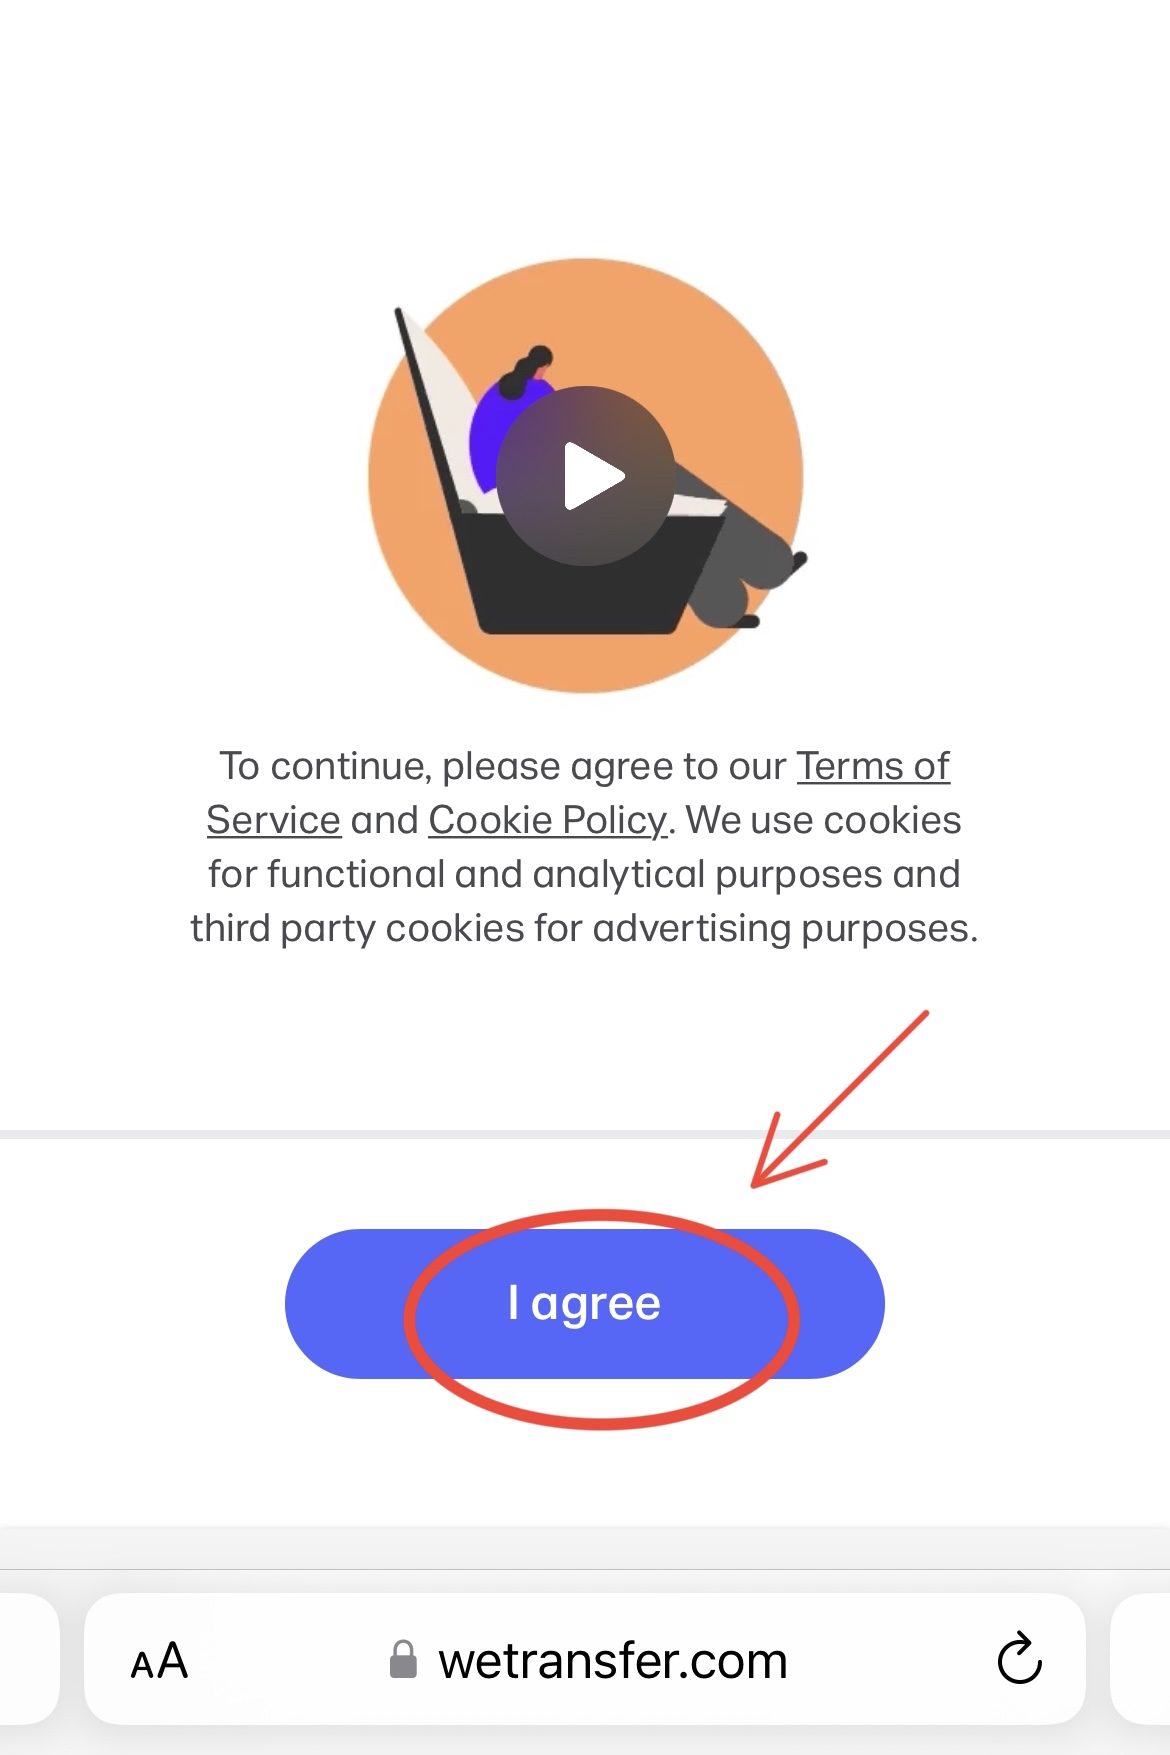
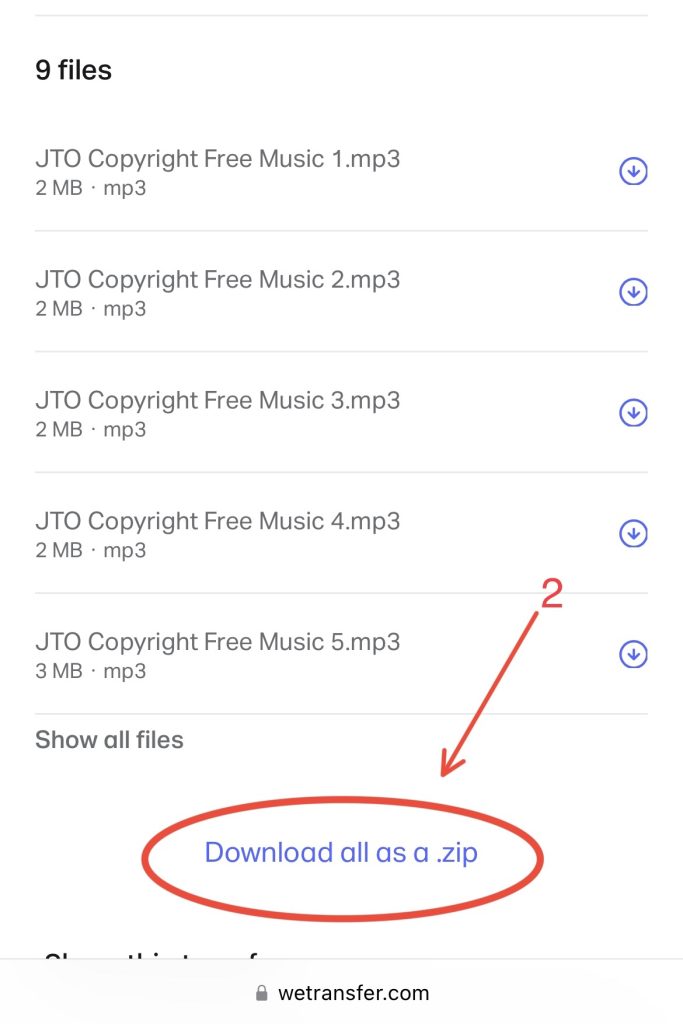
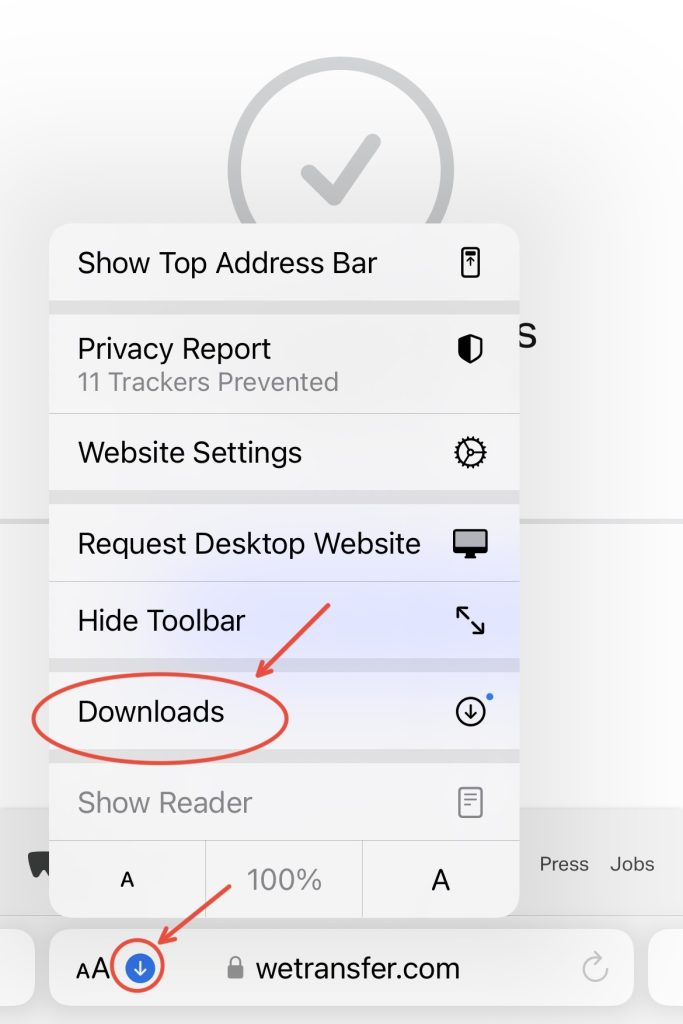
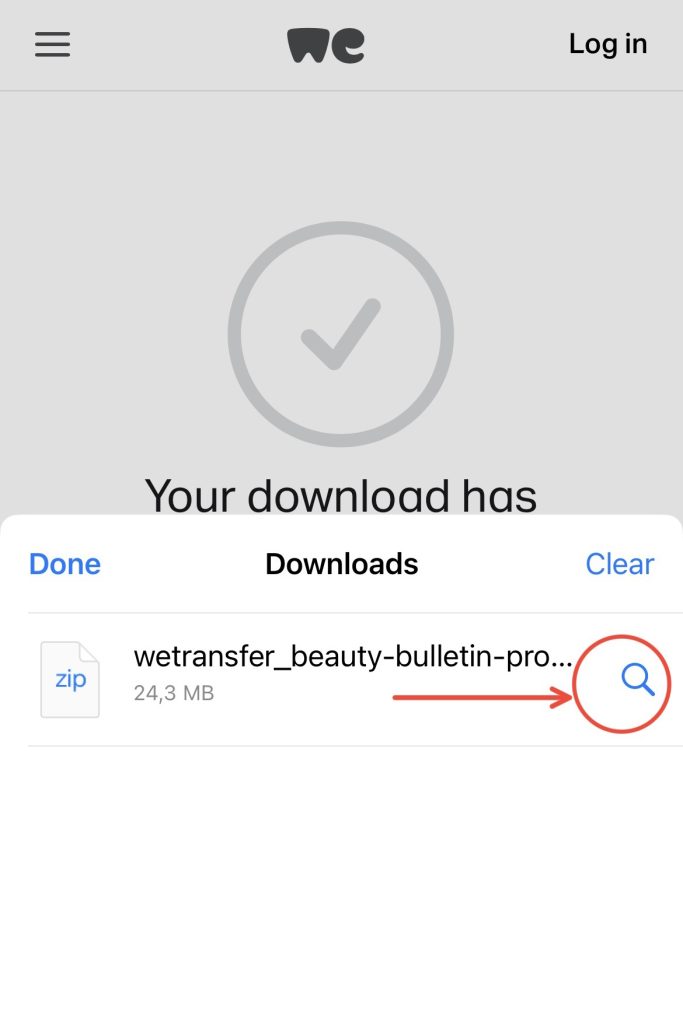
- Click on the download link sent you by our team.
- You’ll be redirected to WeTransfer’s recipient page, which sports a big “download” button.
- All you have to do is click that button, and you’ll begin downloading the file.
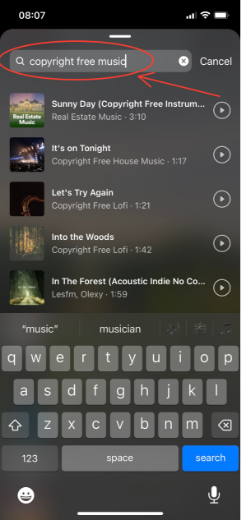
11. WHAT IS NON-COPYRIGHTED MUSIC? 🎵
When adding music to your Instagram videos it is very important to use non-copyrighted music 🎵. If you use copyrighted music, the Instagram algorithm will detect it and will likely remove your video, so it is always best to use non-copyrighted songs.
Non-copyrighted music is the music that can be legally used by the public. Our team will give you a list of potential non-copyrighted songs for you to choose from for your videos.
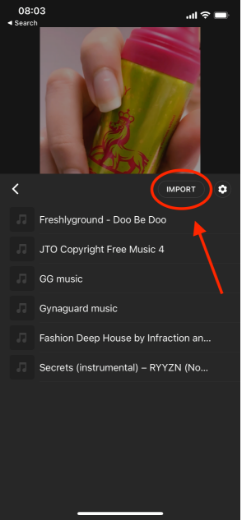
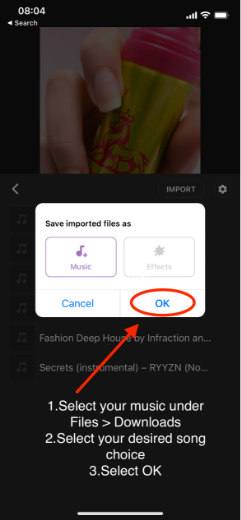
12. ADDING NON-COPYRIGHTED MUSIC TO INSTAGRAM VIDEOS 🎵
When you’re creating your Reel there are a two different ways that you can add non-copyrighted music:
- In the WeTransfer Link that our team sends you, there will be a folder full of non-copyrighted songs for you to choose from, you can download these files to your phone or computer and then add them to your video in iMovie or In Shot, or your chosen editing app.
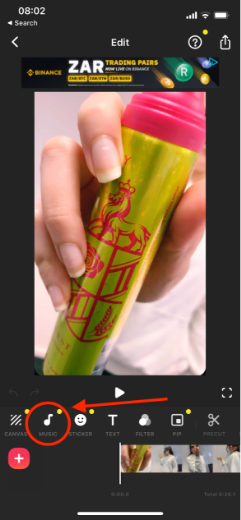
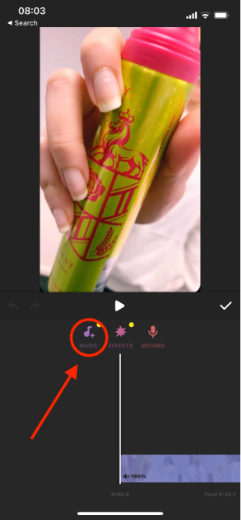
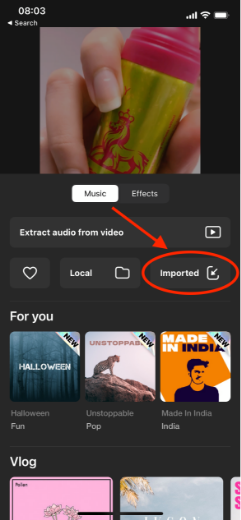
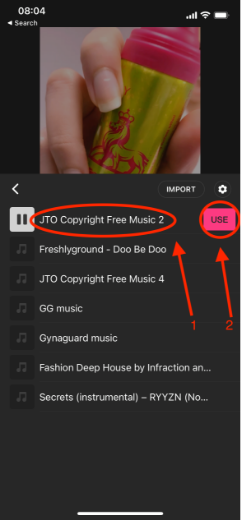
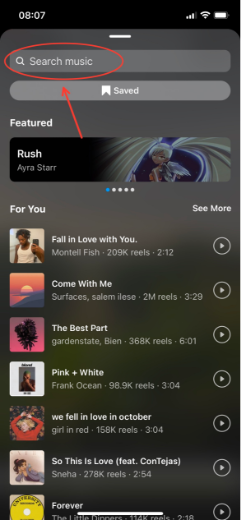
2. If you are only using the Instagram app, you will be given an option to add music to your Reel and will be able to search non-copyrighted songs to suit your theme.
13. HOW TO ADD A LINK TO YOUR INSTAGRAM BIO 🔗
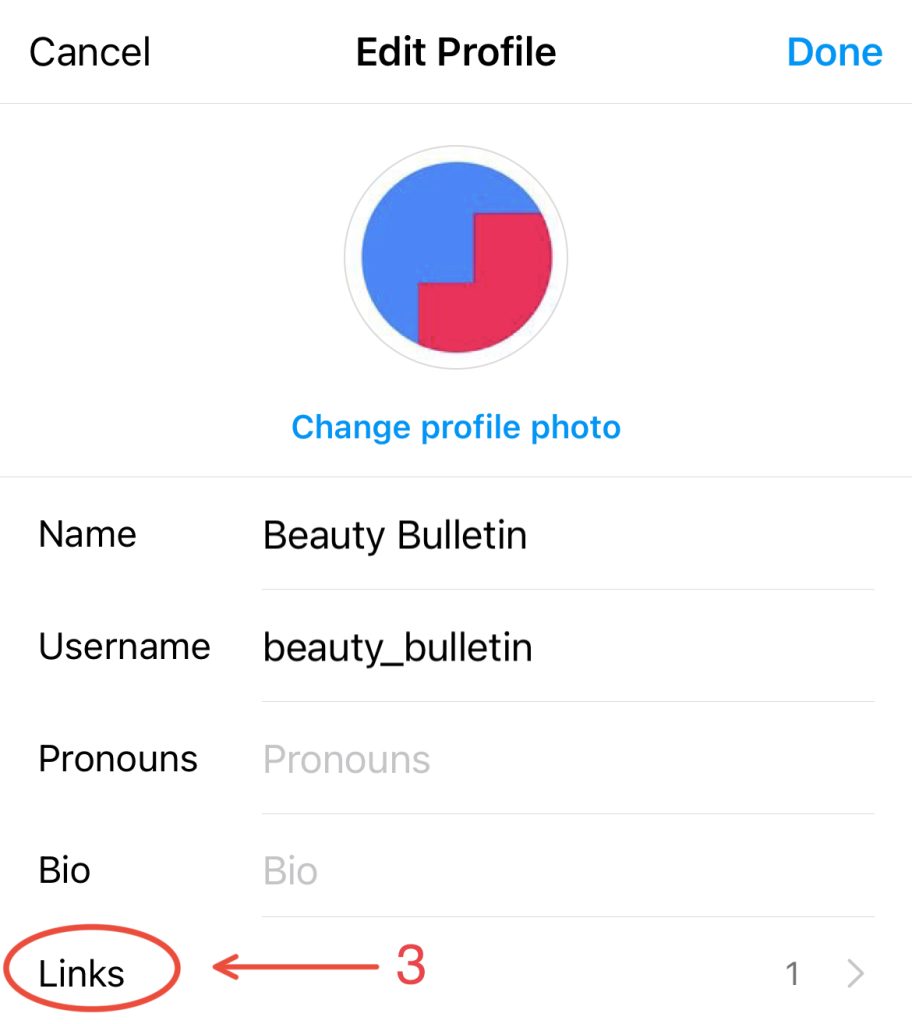
Your bio is what appears below your profile picture when you are on your Instagram profile. You can personalise the text that appears below your name to add a link, here’s how:
- Go to your Instagram profile
- Click on ‘Edit Profile’
- You should see these options: Name, Username, Pronouns, Bio, and Links. Click on ‘Links’ and then click ‘Add external link’.
- Add the link given to you by our team to the ‘URL’ field and save the changes and tap ‘done’ in the top right corner. Now the link should appear in the bio section of your profile for your followers to click on.

14. HOW TO ADD A PERSONALISED ‘BUY NOW’ 🛒 LINK TO YOUR INSTAGRAM STORIES
A ‘buy now’ link is an exciting new feature that lets you add clickable links to your Instagram Story so that anyone who watches your Story can click on the link and be taken directly to an online page where they can buy the products you are advertising 🛍️. Here’s how to do it:
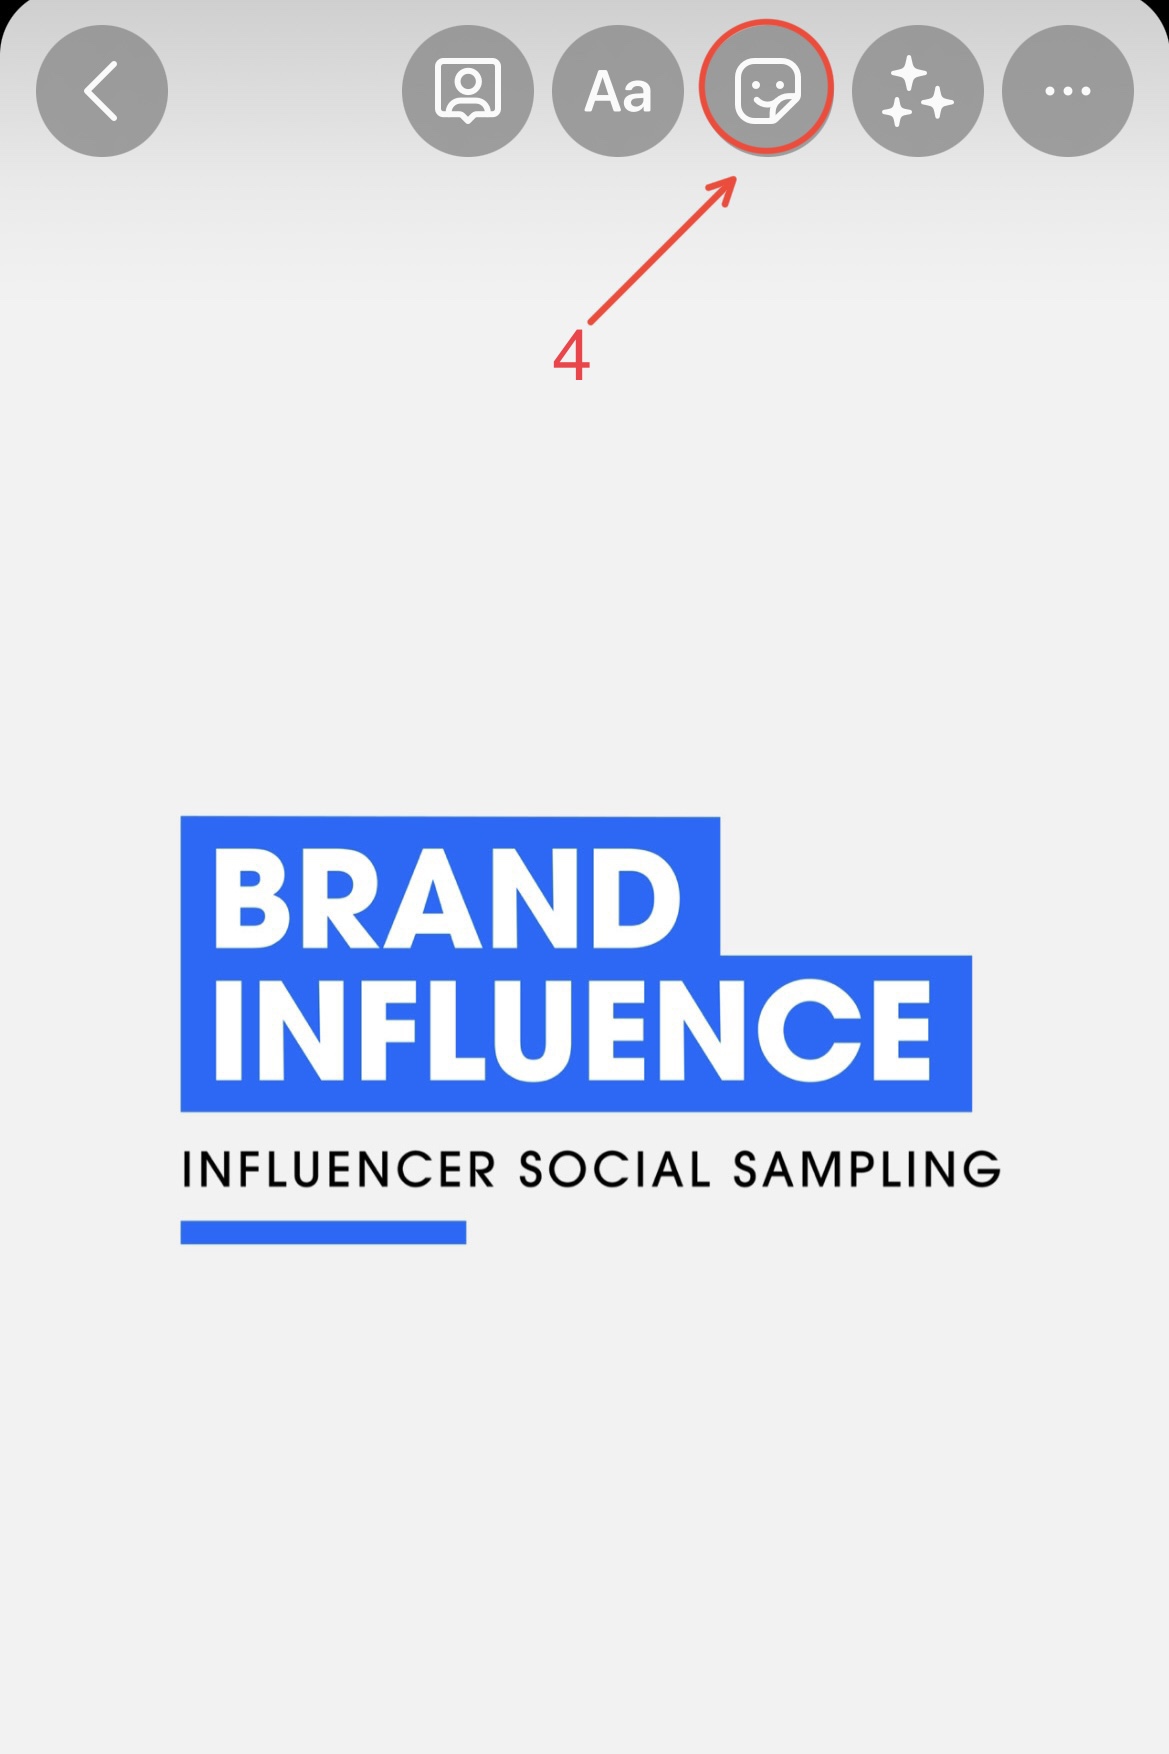
- In the Instagram app, tap the plus sign
- Select Story (rather than Post, Reel, or Live).
- Create your Story using all the exciting images you have at your disposal (or share a feed post to your Story)
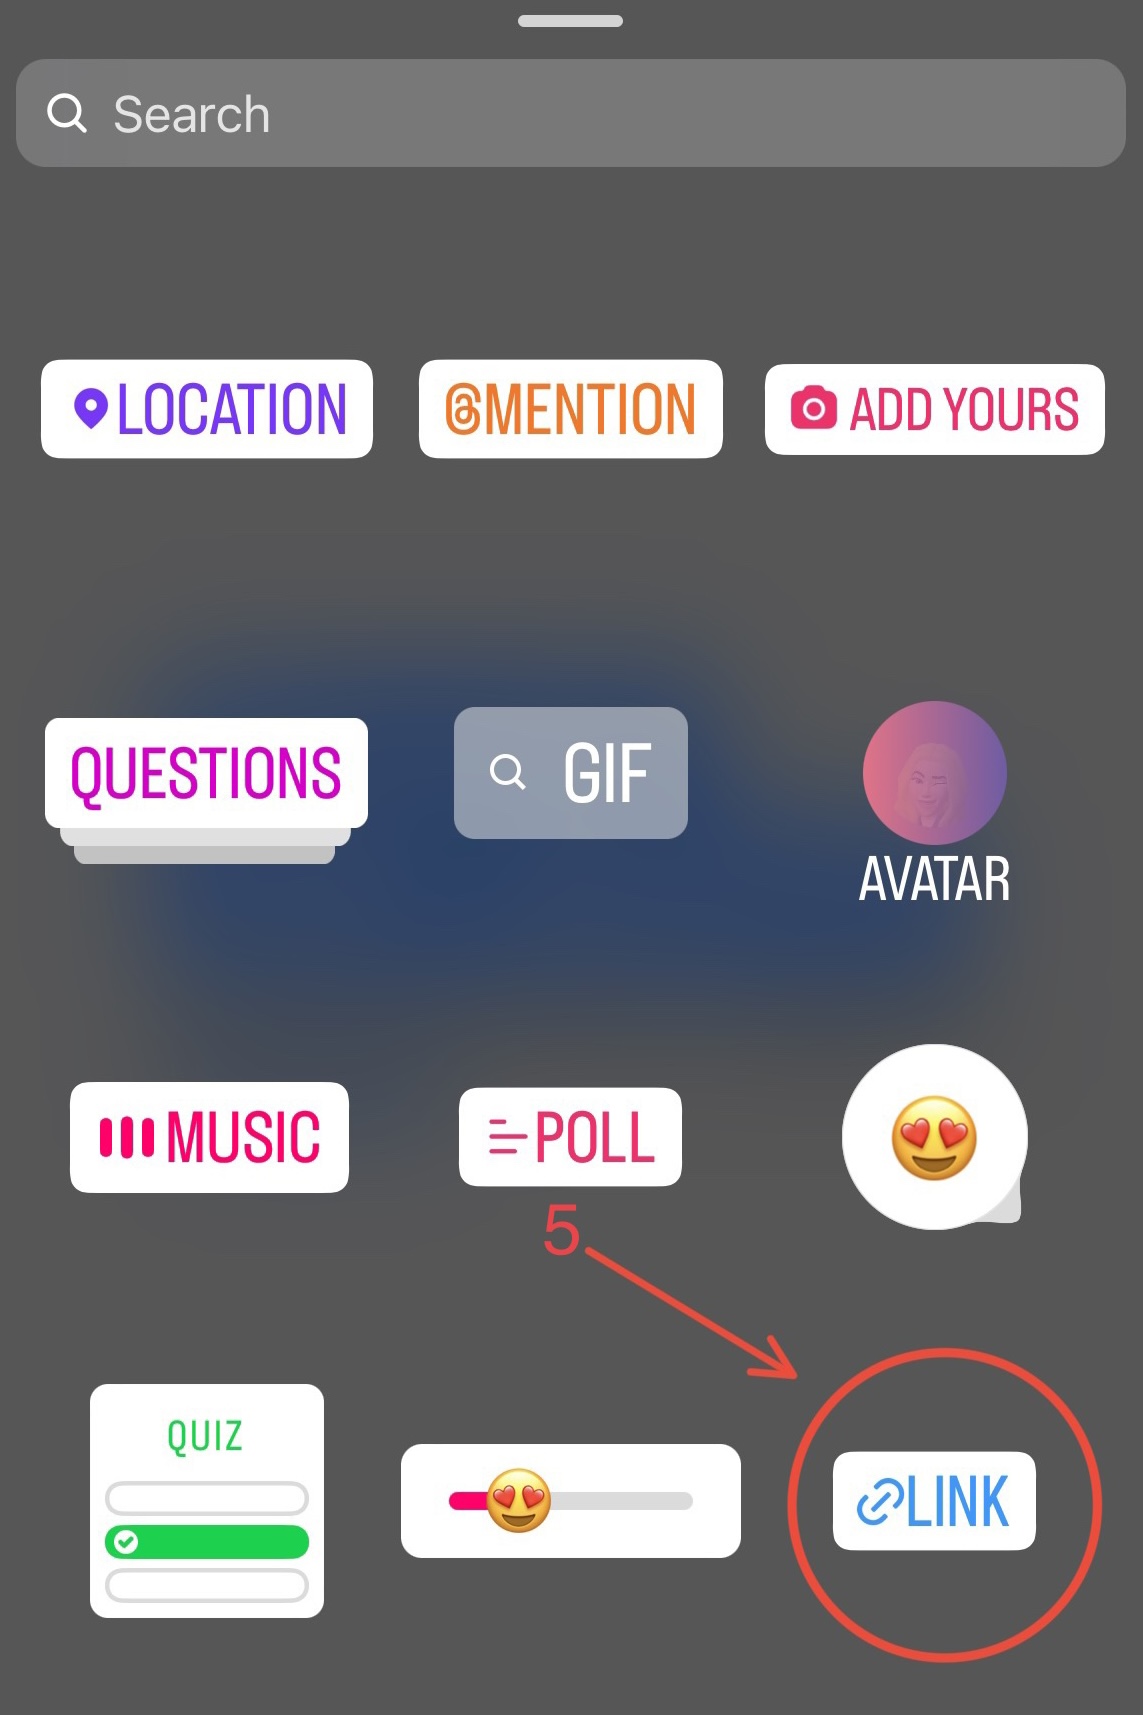
- Tap the Sticker icon in the top row (the square smiley face)
- Click the sticker that says ‘LINK’ 🔗
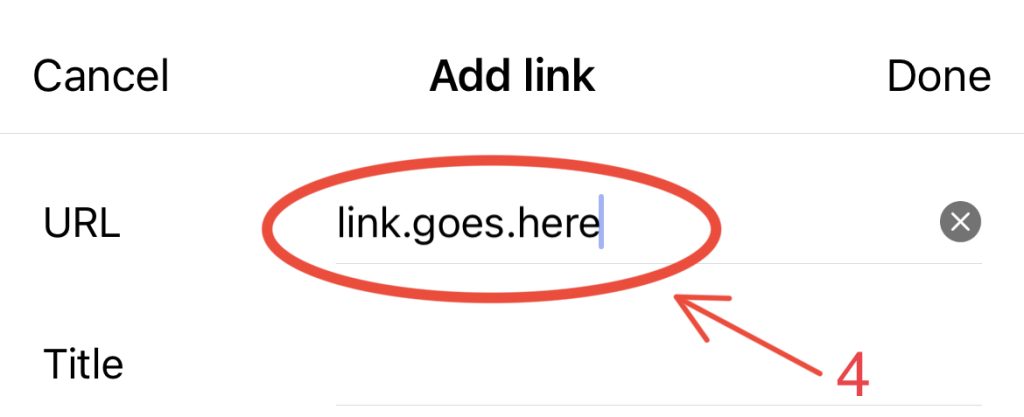
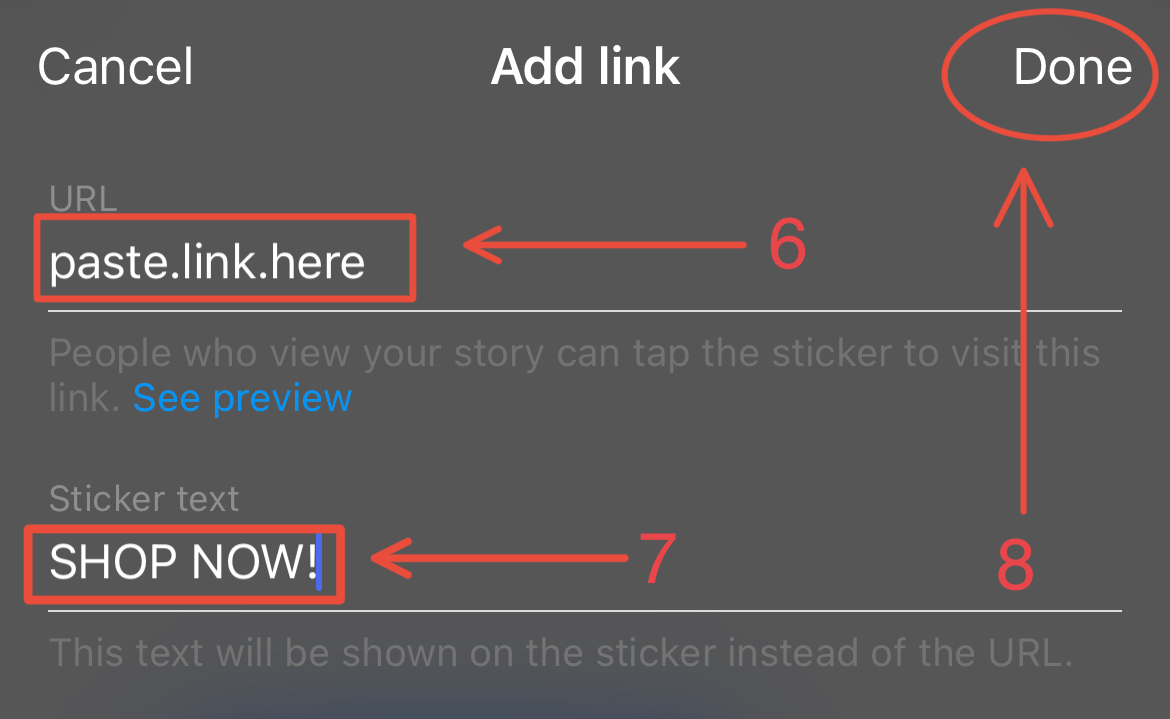
- Type in or paste the link provided by our team into the ‘URL’ field.
- Click ‘Customise sticker text’ and add desired customised text (eg: BUY NOW, SHOP NOW, GET YOURS HERE etc)
- Click ‘done’ to place the sticker on your Story
- Pinch to resize it and tap to change the colour/style of the link button, to suit your story aesthetic.
- Then share to your Story, and you’re done!
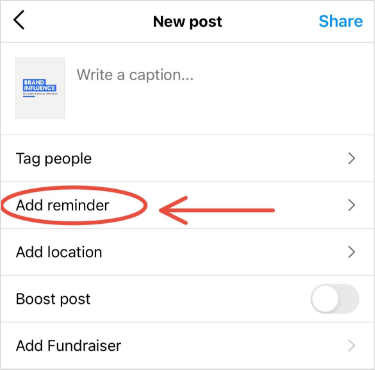
15. HOW TO ADD A CALENDAR REMINDER TO POSTS
Instagram Calendar reminders are a GREAT way to inform your followers about competitions and giveaways that are happening on specific dates. You can add a ‘reminder’ to your post with the exact dates and the title of the e-vent so that your followers can set their own reminders directly from your post to be sure not to miss out. Here’s how to:
- Create a post
- Add a caption
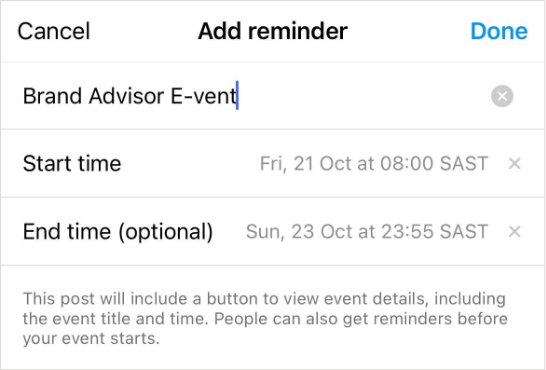
- Underneath ‘tag people’ click the ‘add reminder’ field.
- In the ‘reminder name…’ field add the e-vent or giveaway name/title
- Select ‘start time’ to add the correct starting time and day of the e-vent. Once you have added the ‘start time’, an ‘end time’ field will appear below
GENERAL:
If you have any questions or concerns, our team is just a phone call away. If you need any assistance or would like us to explain something in more detail please don’t hesitate to reach out to us via call, email or WhatsApp and we’ll see how we can help you or set up a one-on-one session so we can go through everything together.